- 中文简体
- 中文繁体
- English
- Русский
- 日本語
- 한국 사람
- Français
- Deutsch
- हिंदी
- Português
- Español
- بالعربية
- Corsu
- guarani
- kinyarwanda
- Hausa
- Norge
- Nederlands
- Yoruba
- गोंगेन हें नांव
- Latina
- नेपालीName
- čeština
- ʻŌlelo Hawaiʻi
- ჯორჯიანიName
- فارسی
- भोजपुरी
- беларускі
- Kiswahili
- ÍslandName
- ייַדיש
- tur
- Gaeilge
- ગુજરાતી
- Slovenská
- היברית
- ಕನ್ನಡ್Name
- Magyar
- தாமில்
- بالعربية
- বাংলা
- Azərbaycan
- lifiava
- IndonesiaName
- dansk
- Shona
- Bamanankan
- Lietuva
- Tiếng Việt
- Malti
- Türkmençe
- অসমীয়া
- català
- සිංගාපුර්
- Suomalainen
- Кыргыз тили
- Eʋegbe
- Hrvatski
- a n:n
- Quechua
- bosanski
- Maori
Introduction
The Raspberry Pi is a small, affordable, and versatile single-board computer (SBC) developed by the Raspberry Pi Foundation. It was designed with the primary goal of promoting computer science education and providing an accessible platform for learning, experimentation, and creative projects. In the world of embedded computing, few devices have captured the imagination and innovation of enthusiasts and professionals alike quite like the Raspberry Pi. Born out of a desire to promote programming and tinkering, the Raspberry Pi has evolved into a versatile platform with applications ranging from DIY projects to complex industrial solutions. In this technical blog, we will delve into the core components, capabilities, and potential applications and various models along with a brief guideline on how to use a Raspberry Pi.

Core Components
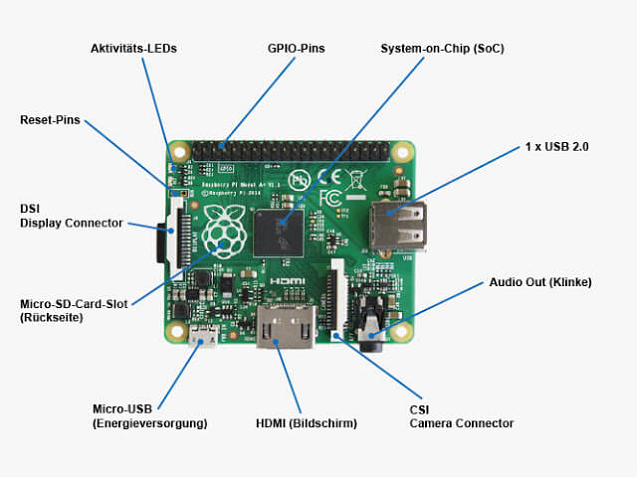
A Raspberry Pi consists of various components integrated into a single printed circuit board. These components work together to provide computing power, connectivity, and versatility. Here are the key components found on a typical Raspberry Pi board:
1) Central Processing Unit (CPU)
The CPU is the brain of the Raspberry Pi, responsible for executing instructions and performing calculations. The CPU architecture can vary depending on the model, ranging from ARM Cortex-A53 to Cortex-A72 cores in more recent models.
2) Memory (RAM)
RAM (Random Access Memory) provides the working memory for the Raspberry Pi. It temporarily stores data that the CPU needs to access quickly. RAM capacity varies among different Raspberry Pi models, ranging from 1GB to 8GB in more recent models.
3) GPIO (General Purpose Input/Output) Pins
GPIO pins are essential for interfacing with external components like sensors, LEDs, buttons, and more. These pins allow the Raspberry Pi to send and receive digital and analog signals, enabling interaction with the physical world.
4) USB Ports
USB ports allow the connection of various peripherals like keyboards, mice, USB storage devices, cameras, and more. The number of USB ports can vary depending on the Raspberry Pi model.
5) Ethernet Port
Some models of Raspberry Pi come with an Ethernet port, enabling a wired network connection for internet access or local networking.
6) Wi-Fi and Bluetooth
Many modern Raspberry Pi models are equipped with built-in Wi-Fi and Bluetooth capabilities. Wi-Fi provides wireless network connectivity, while Bluetooth allows communication with devices like wireless keyboards, speakers, and more.
7) HDMI Port
The HDMI (High-Definition Multimedia Interface) port allows the Raspberry Pi to connect to monitors, TVs, and displays, providing video and audio output.
8) Audio Jack
The audio jack lets you connect headphones or external speakers for audio output.
9) Micro SD Card Slot
The micro SD card slot is used for storage, housing the operating system, applications, and user data.
10) Camera and Display Connectors
These connectors allow you to attach camera modules and displays to the Raspberry Pi for image and video capture and output.
11) Power Input
The power input is where you connect the micro USB power supply to provide power to the Raspberry Pi.
12) Heat Sink and Thermal Management
Many Raspberry Pi models have heat sinks or heat-spreading components to manage the temperature of the CPU during operation.
13) Power Indicator LEDs
These LEDs indicate whether the Raspberry Pi is receiving power and whether the micro SD card is being accessed.
These are the core components commonly found on Raspberry Pi boards. Each component contributes to the Raspberry Pi's ability to function as a versatile and affordable single-board computer suitable for a wide range of applications.
Recommend News
-
Tel
+86-0755-83269835 -
E-mail
-
Whatsapp


